Most Frequent Questions

Please find below answers to your questions.
If you can't find any answers, please contact us via our contact form.

1. Food processors

  • What is the guarantee granted to my product ?
    GUARANTEE

    The duration of the guarantee and H.Koenig Winkel products and 2 years on equipment from the original date of purchase or delivery date.

    WARRANTY CONDITIONS
    The warranty covers all failures arising under normal use complies with the uses and specifications present on the manual.

    This warranty does not apply to packaging or transport problems during shipping the product by its owner. It also does not include normal wear and tear or maintenance or replacement of consumable parts,

    DISCLAIMER OF WARRANTY
    - Accessories and wear parts (*): filters, brushes, damaged glass or ceramic.
    - Regular maintenance of the machine cleaning, battery charging, scaling ...
    - All outages occur due to improper use (impacts, failure to comply with power supply recommendations, poor conditions of use ...), lack of maintenance or a function of diversion of device and the use of unsuitable accessories.
    - The damage that an external origin: fire, water damage, power surges ...
    - Any material that has been removed even partially by persons other than those authorized (including the user);
    - Products whose serial number is missing, damaged or unreadable that would not allow its identification;
    - Products subject to rent, demonstration or exhibition.
    - Batteries for robot vacuum cleaner (these are guaranteed for 6 months).
    (*) Wear parts: some component parts have material during use of it a function that causes them to wear, this wear is normal and influenced by the conditions of use and maintenance; these parts are not covered by warranty.
    Accessories supplied with the unit are excluded from the warranty field. It will therefore be replaced or exchanged. However, some accessories can be purchased directly via our website: 

    Return to top

  • SAV procedure

    If problems on a product just contact our customer service by email at sav@hkoenig.com.So that your product is supported, thank you to join a copy of the invoice and indicate in your email the following information:name:Address :Postal code :City :Phone :Mail:reference of the device:Serial No:Date of purchase :Vendor Name:Descriptionof the problem:Our service will then inform you what to do.

    After agreement of our service, you will have to return your product (in its entirety) to us by attaching the return number (RMA) that will have been given to you by the service.

    The costs and risks associated with the shipment of the product remain at your expense, so it is recommended to ship the product with an acknowledgement and transport insurance in case of significant value of the goods.
    The product must be returned to us in its original packaging (preferably).
    After processing by our after-sales service, the product will be returned to you as soon as possible (usually five to ten days of processing, unless a part is immediately unavailable).

    Return to top

  • Where to find accessories for my product H.Koenig ?
    Accessories type filters, bags, batteries ... and spare parts of our products are availablefrom the SHOP

    For questions, please contact our customer service by email at sav@hkoenig.com

    Return to top

  • I lost my manual, where can I find one ?
    The manual of your device and available on its product page, under the "download themanual."

    In case of specific request simply contact the service representative to get the manual ofyour device.

    Return to top

  • Robot Gourmet

    Are there additional revenue for my GOURMET robot?
    Many recipes are available on the community site

    Feel free to add your recipes!

    How to use different accessories GOURMET my robot?
    Here is some information on the use of different accessories.

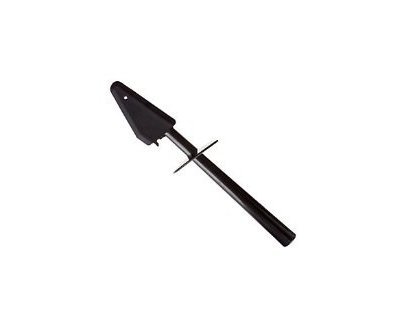
    Spatula: you will stir the food during preparation, heat-resistant and equipped with a safety disc, it is perfectly adapted to your device.

    The guard: to mix liquids and solids. Put the blade guard on the blades.


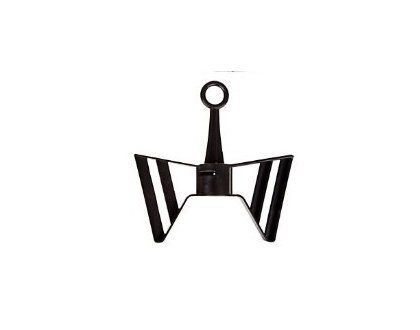
    Butterfly drummer (for use with the guard): mixing continuously, avoiding the excesses of warm milk and perform various preparations. Use a speed of less than 4.


    The steam basket: It is intended to steam small quantities of food, poach fragile foods that could not be
    assigned to the bowl (eg. Walnut St Jacques, red mullet fillets ...), cooking side dishes (rice, potatoes,
    cereals ...) to accompany your food cooked elsewhere.


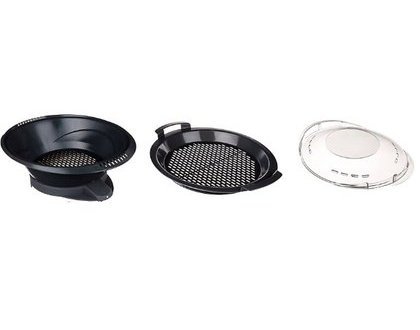
    Steam tray: It is the ally of light preparations and will help preserve vitamins, minerals and trace elements.
    My robot GOURMET robot speed does not exceed 5 after cooking, is this normal?
     
    This is normal.
                 
    According to the cooking program, the machine will not select a speed higher than 5 if the detected temperature is over 50 degrees, special programming security.
     
    Depending on the course, you can mix the vegetables before or perform the mixing speed to 5 after cooking.
     
    When using the butterfly, the speed of the robot can not exceed 4 and
    maximum capacity must not exceed 1.5L
    In fact, the speed 9 / Turbo is not necessary for most foods.
     
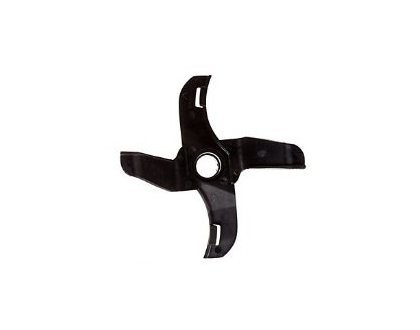
    I can not remove the blades of my GOURMET
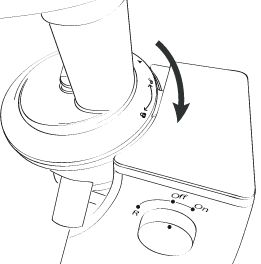
    To disassemble the blades of the bowl you simply turn off the device. To install the blade guard and then place your hand in the bowl to catch the semi-circle of the blade guards.
    With your right hand, turn the wing nut counterclockwise to clockwise. Then remove the blade with his left hand.


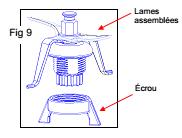
    Warning !! The blades are very sharp. Do not touch the edge of the blade to avoid injury. Hold the top of the blades when you replace or move to avoid dropping them and cause an accident.
     
    How to clean the bowl GOURMET my robot?
    To clean the bottom of your bowl, simply to use white vinegar.
    Fill the bowl up knives and add a few drops of dishwashing liquid. Leave on for 3 min at 60 ° C Speed ​​1 and wait until the mixture cools.

    For more stubborn stains, we recommend rubbing with abrasive cream with a special stainless steel sponge.

    To prevent the fuel attach to bowl, we advise you to choose foods at room T °, ​​lower the T ° and increase the speed and preparation time for the recipe that is problematic.
     
    My robot gets Overloading what?
    Overloading the mode on the HKM1028 is a motor protection that appears when the engine overheats or the machine is overloaded. If the machine is overloaded, the orange LED (overloading) lights and a buzzer sounds. The lights remain lit until the user does nothing. Unplug the unit and remove some content. It is possible to use the device again after 15 minutes. It is then advisable to decrease the quantities in order not to overload the device.

    We also advise you to respect the conditions of use of different accessories.
     
    The blade guard must only be used for mixing soft ingredients or liquids.
    The speed of the robot must not exceed 4 when you use it.
     
    Similarly to the butterfly can be used with the blade guard. The butterfly will ensure better mixing and avoid sticking when you heat milk, butter or fruit sauce.
     
    Caution: the blade guard and butterfly should not be used when mixing the dough.

    Return to top

  • MX18
    My robot MX18 INFORMATION.
    Warning the blender MX18 is not designed to pour hot liquids (over 50 ° C)

    MX18 My robot does not work.
    Your robot is equipped with a safety function for the different elements should be placed as on the next picture.

    The bowl of the handle and the input stack of food on the right. The handle of theblender also positioned right. Otherwise, the device will not work.

    Return to top

  • MX16
    Food processors have multiple security systems.

    When the parts are not properly installed on the robot it will not start.
    Make sure the bowl and the blender is properly attached to the robot. Just follow the direction of the arrow on the product to the padlock indicating that accessory is locked.
    So that the product can turn on it is necessary that the bowl and the blender isattached to the product and that the lids are properly engaged.

    Return to top

  • TRT180
    What do the buttons settings of my TRT180?

    The temperature buttons are graduated from 1 correspondent 3 the following temperature:

    1-100 ° C 2-155 ° C 3-210 ° C

    Return to top

  • Erratum MXC18

    Une erreur s'est glissée dans la notice du MXC18.

    La tasse de mesure (Measuring Cup) ainsi que la passoire (Colander) ne sont pas inclus dans le pack.

    Return to top

  • What is the availability of spare parts?
    AVAILABILITY OF SPARE PARTS

    The protection of the environment and the fight against waste are our main concerns,

    H.Koenig undertakes to ensure that the products are repairable for 5 years following the purchase and that all parts are available during this period.
    Repair in no way alters the quality of the product, it helps to limit the ecological impact of the waste.

    TERMS AND CONDITIONS OF AVAILABILITY

    Parts availability is defined as any purchase starting March 1, 2015. H.Koenig undertakes to provide the vendors and repairers with the spare parts necessary for the repair of the products within two months. In case of force majeure, a standard product exchange or refund solution will be offered to the user.

    Return to top

  • ERRATUM AC8
    An error appears on the package of accessories AC8 for kneading robot KM80s. Indeed 2 graters are provided and not 3.

    Return to top

2. Daily cooking and breakfast

  • Airfryer

    WHAT CAN I PREPARE IN FRY700
    You can prepare all kinds of food like fries, potatoes, snacks, meat and poultry. You can even bake brownies!

    SHOULD WE ADD OIL TO THE FRYER?
    Adding oil is only necessary when preparing homemade dishes from fresh ingredients, such as peeled fresh potatoes or unpeeled chicken. Adding oil creates a crispy layer on food and improves its taste.
    You must add oil to the ingredients before you start frying in hot air. Do not add oil directly into the FRY700!
    To add oil to homemade potato dishes, such as French fries, follow these steps:

    1- Peel the potatoes and cut them as you see fit.
    2- Soak the potatoes in a container for at least 30 minutes, then dry them with a paper towel.
    3- Pour 1/2 tablespoon of oil into a bowl. Put the potatoes in the bowl and stir until they are coated with oil.
    4- Remove the potatoes with your fingers or a kitchen utensil and put them in the FRY700 basket.

    To add oil to larger ingredients, such as chicken drumsticks or like meat:

    1- Dry the outside of the food with paper towels, if necessary.
    2- Using a brush, lightly brush food or use an oil spray. Apply only 1 coat of oil. The additional oil will flow into the tank during the hot air frying process.

    Tip: You can also marinate meat or poultry instead of brushing them with oil.

    Return to top

  • Toaster
    Four icons correspond to the following function :

    réchauffer Function warm heating to heat an already toast;
    Bagel Function Bagel bagel and sandwich: grill one side and warms the other;
     Stop-Function;
    defrost Function defrost thawing.

    Return to top

  • AGR60
    I can not find the second cone in the pack of my AGR60
    As stated on the pack AGR60 the electric juicer is supplied with two interchangeable cones.Both cones are simply switched one over the other, you simply make a slight pressure to remove the cone top

    Return to top

  • Coffee maker

    I can not set the time of my STW 25 / MG 15

    Here's how to set the clock:

    Simply plug the unit.

    On pressing the "Prog" on the display the text "CLOCK" button should appear.

    You can then change the hour (HOUR) and minutes (MIN) using the corresponding buttons.

    By pressing the "PROG" button you can adjust the same time the automatic programming.(TIMER) should appear over time.

      then simply press a third time the PROG button to turn the machine on the clock

    Return to top

  • Microwave
    What do the Combi1 modes, Combi and Combi 2 3 of my VIO7?

    Combi1, Combi2 Combi3 and match combination cooking the microwave oven and grill. The operation is classified into three levels with different combination power settings.

    Combi1:
    Microwave 30% + 70% Grill, suitable for fish such

    Combi2:
    Microwave 49% + 51% Grill, suitable for omlets

    Combi3:
    Microwave 67% + 33% Grill, suitable for birds such

    Return to top

  • Kettle & teapot
    How to clean my kettle ?
    After a number of uses, a thin film of limestone can form on the bottom and inner cavity of your kettle. It is therefore advisable to descaling.

    For this, fill the kettle to the maximum level with a mixture of water and white vinegar with 2 parts of water for 1 part of vinegar.

    Then bring the mixture to a boil of 100°C and let stand overnight.

    The next morning, drain the water and boil fresh water several times at 100°C until the vinegar taste is completely gone.

    Return to top

  • I can’t turn on the percolator on my XP15
    It is enough to put the different parts in place as indicated in the manual by pressing lightly, this ensures a better sealing.

    Return to top

  • ERRATUM RX6
    An error appears on the RX6 record. Indeed, there is no citrus press.

    Return to top

3. Home made cooking

  • Ice maker
    HOW TO SET THE BACKLIGHT ON MY KB15
    The machine has two lighting mode for the LCD.
    A standby mode and a continuous mode.

    Sleep mode: automatic lighting at the touch of a button then power off after 10 seconds.
    Continuous Mode: Continuous Lighting.

    To switch from one mode to another simply hold press the button "CLOCK" and then press and hold the button "TIMER" for 6 seconds.
     
    CLEANING PROCEDURE FOR MY MACHINE GLACON
    The practice of regular cleaning is essential for your ice maker for hygienic reasons. Mold and bacteria can form if you do not clean the machine.

    - You must disconnect the power supply of the machine.
    - Remove the ice bin and wash with a mixture of dishwashing liquid is hot water.
    - Rinse well and dry.
    - Clean the water filter in the bottom of the tank.
    - Remove the drain plug at the rear of the machine, the excess water will flow.
    - To completely empty the machine, tilt it slightly (do not exceed 45 ° inclination) backwards.
    - Use a damp cloth to clean the inside and outside of the machine.
    - Do not use detergents or abrasives.
    - Rinse several times with clean water to remove any residue of dust or soap.
    - Dry with a dry cloth.
    - Replace the ice bin
    - Replace the drain plug.
     
    Then simply press the TIMER button 5s to complete the operation and restart the cleaning alarm of the machine.

    Return to top

  • Turbine ice
    THE TURBINE ICE IS NOT ENOUGH COLD AND ICE DOES NOT MA
    Your machine performs a cycle of about 50 minutes, the ice must be made after 30/40 minutes. To check the proper operation of your device, you simply check it by turning empty. It is normally down to -30 ° C. If this is not the case, thank you to contact the service to sav@hkoenig.com.

    THE BLADE MA FAN RUNS UNTIL THE END OF THE CYCLE
    This is normal, it is possible that the blades stop when the ice is taken before the end of the cycle. An average cycle lasts 35 to 40 minutes. Otherwise, there is a problem of the engine block to be replaced.

    PREPARATION TIPS FOR TURBINE ICE
    Here are some tips for preparing your ice. We advise you :

    • To set to churn on a cold preparation. (At least 6 hours in refrigerator. This will boost flavors) .This step also prevents the ice is not or little taken after several cycle turbine. This allows for a smoother and without ice crystals.

    • Run the vacuum cream maker: put in your first turbine started, and then pour your preparation. This prevents the preparation of freezing cold which could prevent the blades from turning.

    • Fill the container half of the turbine: It is essential to complete the turbine half to leave room to prepare. The ice will double in volume.

    • Add an egg white to improve the smoothness: adding 1 or 2 egg whites in your sorbets or frozen preparation just before the turbine, you will gain in smoothness indeed the egg white will add air the preparation.

    • Cold chain: it is best to keep the container or ice will keep in the fridge for the preparation which will prevent the ice from melting during the operation.

    • Remove ice or sorbet 15 minutes before the service: to have a creamy texture for service and tasting.


    Return to top

  • Ice cream maker
    PREPARATION TIP.

    Place the bowl in the freezer (- 18 ° C) for at least 12 hours. Remove the tank at the last moment, when your ready and chilled preparation. To see if your tank is frozen, shake it, it should not make noise. Refrigerate the preparation before putting in frozen tank; To take, it will take about 30 to 40 minutes to prepare. The machine must be disconnected before adding the mixture, in order to avoid an excessive cooling on the sides of the bowl. Toensure best results always use fresh ingredients. Caution, do not refreeze the ice was thawed.

    HOW TO PREVENT THE ICE IS HARD?
    The final texture of the ice depends on the ingredients used. Chocolate ice cream will beharder than vanilla ice cream. To avoid problems we recommend you leave the ice 5 to 10 minutes before serving.

    Return to top

  • Juice extractor
    JUICE EXTRACTOR

    EXTRACTEUR MY NOT START TO DO?
    On the GSX12 there is a security. It is necessary that the small tab cover is inserted into the engine block. Simply position the cover and aligning the padlock icons open or close depending on the desired position.

    BOWL IS MY EXTRACTEUR JAMMED ITS BASE ENGINE?
    If the bowl is locked, press the reverse button - stop - forward [REVERSE - OFF - ON] in this order; to extract blocked ingredients. Then place your hands on top of the lid and press firmly down simultaneously turning the cover in the direction of clockwise this will releases the bowl.

    IS IT POSSIBLE TO INSERT THE FRUITS WITHOUT PEELING?
    Apples, carrots, tomatoes, celery can be introduced without prior peel. We strongly recommend to peel citrus fruits (oranges, lemons, grapefruit, clementines) because of the bitterness of their skin. Without the juice will be very bitter. Fruit hard skin should not be ready inserted in the extractor as: pineapple, mango, watermelon

    HOW TO PREPARE FRUITS AND VEGETABLES?
    Most fruits and vegetables do not require preparation cepandant fruit or vegetable:
    [Hard Pips] Mangoes, peaches, apricots, nectarines, avocados, ...
    Remove seeds before extracting the juice.
    [Hard or inedible skin] Pineapple, mango, orange, melon ...
    Peel before squeezing.
    [Frozen fruit or ice] Strawberries, blueberries, frozen raspberries, etc.
    It must be defrosted before extraction, do not insert ice.
    [Vegetable or animal oils]: Sesame seeds, butter, margarine, etc.
    Not to introduce into the extractor.
    [Other]:
    NOIC coconut, cane sugar ....
    Not to introduce into the extractor.

    WHEN TO USE THE REVERSE?
    The reverse allows to restart the device when pieces are blocking removal.

    JUICE EXTRACTOR erratum
    An error appears in the label of our extractor. Indeed, there is no recipe book

    Return to top

  • Centrifuge
    DO THE REST OF FRUIT?
    There are several possibilities. You can use them for cooking, for example flavor your cakesor cake. You can also use them for gardening ...

    SHOULD I PEELING FRUITS AND REMOVE THE SEEDS FOR PREPARING JUICE?
    Fruits and vegetables have thin skins can without problem be ready inserted in the centrifuge. You need only peel the fruits with thick skin and bitter as lemons, oranges, grapefruit. It is not necessary to remove the small seeds of the watermelon or grapes, but you must remove the stones of fruit such as peach, cherries, etc.

    MY UNIT HAS STOPPED IN FULL PREPARATION?
    This happens when the engine overheats. Allow to cool before attempting a new road layoutfor future use it will reduce the time of use.

    Return to top

  • Beer machine
    WHAT ARE THE FUTS COMPATIBLE WITH MY BW1880 BEER MACHINE?

    Only 5L universal barrels and Heineken barrels are compatible. The machine is equipped with a CO2 cartridge adapter. Leave the cask for 12 hours in the refrigerator before placing it in the appliance.


    WHAT ARE THE FUTS COMPATIBLE WITH MY BW1778 BEER MACHINE?

    Only Heineken 5L barrels are compatible.

    HOW TO COOL THE FUTS?

    There are two ways to cool the drum.
    Directly in the beer printer. (between 15h and 20h to get a temperature of 4 ° C) or in the refrigerator (after about 12 hours, depending on the cooling capacity of the refrigerator.)

    THE FIRST DRAW IS FULL OF FOAM?

    First of all, if beer is boiling, it's because it's high in protein. When you serve it, the bubbles come up, and the bubbles take them to the passage, then everything settles on the surface. The more the beer is rich, the more things come back and that produces a thicker foam! This structure is unstable however. The bubbles will eventually burst. Because of this, the moss will gradually disappear. In general, it takes a minute or two. But it varies depending on the beer and the proteins that are there. That's why the beer is frothy and we can appreciate this famous collar.

    The best way to prepare your drink is to rinse it with water to remove any residue from the cupboard or dishwasher. Then, pour the beer by holding the glass upright, and it is only when one to two centimeters of foam appears that one can begin to lean his glass as usual. It is actually the mousse that allows you to enjoy the aromas of our favorite beer! It creates a barrier between the drink and the air, to avoid the oxidation of perfumes. Without this "foam neck", the aromas would flee.

    For a perfect beer:

    1. Refrigerate your cask for at least 10 hours.
    2. Thoroughly rinse the service tube between each drum and the spout.
    3. Install the was in the machine.
    4. Place a glass under the spout: pull the handle down for 2 to 3 seconds then release.
    The first glass contains a lot of foam. Discard the foam and rinse your glass in cold water.
    5. Tilt your glass 45 ° under the spout. This position provides the balance between beer and foam.
    6. Keep the tilt of your glass and quickly pull the handle down. At the end of service, straighten your glass while raising the handle.
    If you have too much froth, your beer is not yet fresh enough where there is impurity in your glass.

    THE MACHINE WORKS CONTINUOUS IS THIS NORMAL?
    Continuous cooling of the machine keeps the beer fresh.

    Return to top

  • Soupmaker
    ThE FOOD HAS BURNT, WHAT TO DO?

    Make sure you have selected the right program.
    Check the level of water or liquid. The fluid level must be between the MIN and MAX levels.
    Be careful not to heat the milk which is not fit for the device and can burn.

    FOOD IS KIND OF BLOCKED IN THE SOUP MAKER

    Remove some of the food and then distribute the remaining ingredients in the bottom of the bowl. Add water and make sure that the liquid level is located between the MIN and MAX.

    THE FOOD IS BURNING THE BOTTOM OF BOWL RESULT MISUSE HOW TO CLEAN MY BOWL?

    Add water in bottom of bowl and leave wet. Leave for a few minutes and then use a non-abrasive cleaning pad to clean the bottom of the bowl.

    Return to top

  • Waffle maker
    HOW TO PREVENT THE BONDING THE WAFFLE PLATES?
     
    This problem can have several causes:
     Lack fat in the dough,
     Excess sugar in the dough.

    In all cases, we recommend lightly oil your plates before your first cook the waffles

    Return to top

  • Correction BP0505
    An error was made in the manual of your device.
    The Bar does not go negative temperature. The thermostat allows a selection of 0 ° to 16 ° C. An amendment to the manual is in progress.

    Return to top

  • Correction DSY500
    An error slipped into the notice of DSY500
    The following accessories: 2 sieve nonstick, 2 leaves of a fruit roll, 2 packets of spicesamples.
    Not included in the pack.

    Return to top

4. Floorcare

  • Vacuum cleaner

    My vacuum cleaner operates several minutes then off for no reason?
    It can be a motor overheating. If the filters are clogged or if the dust bin is full, the engine must "work" more to maintain the suction power. It therefore heats much faster, resulting in that securing, ie that the power is off automatically to protect the motor.
    The solution is to clean the filter, empty the bag or bin, and let the vacuum to cool a few minutes.
    If the problem persists please check that nothing obstructs the passage of air into the negative our service (sav@hkoenig.com) is at your disposal.
     
    My vacuum cleaner LOSE POWER TO DO?
    Your vacuum cleaner has several filters must be cleaned regularly for efficiency is life:

    The HEPA filter: to replace if disposable cleaning otherwise.
    Simply remove dust by tapping. If necessary, wash it with warm water allowed to dry well before replacing.
    HOW TO USE THE ACCESSORIES OF MY VACUUM?
     
    Your SLC85 comes with several accessories.
     
    A floor nozzle as well as two special brushes animals.
     
    (1) A floor nozzle dual position
    (2) A yellow turbo brush that can suck dust particles, lint and animal hair even finer for a deep cleaning of your carpets, rugs and upholstery. With its revolutionary rotary roller brush, turbo brush also cleans laminate floors, parquet and tiles.
     
    (3) A rose brush that has spiked aspiring and retain everything, even the smallest hairs.
     
    (4) The crevice tool to vacuum the baseboards, cracks and inaccessible locations
     
    (4) The brush for upholstery: ideal for small fragile surfaces (table, leather chair, table, etc.).

    At the first use my vacuum cleaner robot beeps persist.
    The beep indicates a fault batterie.Nous advise you to check the correct implementation thereof in the reconnecting.

     
    The remote control of my robot vacuum cleaner is not responding?

    We must first of all synchronize with the vacuum cleaner.

    Once the robot off, pressed for 5 seconds on the "OK" button and hold the button, turn on the vacuum cleaner. 2 beeps indicate that the remote control is operational.

    If despite this operation the remote control does not work:

    1. Check the status of the remote control batteries.
    2. Check the battery status of the vacuum cleaner.
    3. Check the code between the remote and the main body.
    4. Check transmission of remote control signals
    How do the programming of the time on my SWR28 / SWR22?

    Can you do the programming of the start time, but not its duration.

     
    Here is the explanation.

    1. Turn on the vacuum cleaner.

    2. Press the "MON" button automatic cleaning, the central icon (in the recovery form) of the LCD screen of the vacuum cleaner will flash.

    3. Press any week button / or all the buttons of the week you want to set for programming the cleaning, the screen will flash. On the following diagram you will find matching buttons with the days.

     
    4. If you want to cancel all days or registered day setting, simply press the button of the corresponding week.

    5. After setting the day or days you can adjust the start time.


    start time setting:

    1. Press ► to enter the time setting, the icon "88 88" on the LCD screen of the vacuum cleaner will flash.

    2. Press ▲ or ▼ to select the time of cleaning.

    3. Press ► again, 88: 88 flashes.

    4. Press ▲ or ▼ to set the time cleaning

    5. After finishing the setting of the week and the time, press "OK" to save.

    When the unit is connected to the docking station, it will start cleaning automatically at the time and recorded day (when the battery is fully charged) when the cleaning is complete or the battery is low, vacuum cleaner will return to the dock automatically

    HOW TO KEEP MY BATTERY’S AUTONOMY?
    For good battery storage: It is advisable for regular use during the week, to leave its robot vacuum cleaner on its charging base. Indeed if the robot vacuum cleaner remains unplugged, its battery will unload, and risks deep discharge, which is very bad for its lifespan. It is therefore advisable to remove the battery from its robot vacuum cleaner only if it is not used for more than a week, otherwise the robot will continue to consume slightly the energy of its battery.

    Return to top

  • Steam cleaner
    I can not find my steam cleaner accessories

    Our cleaners vapors come with many accessories.

    Very clever, accessories just happen in your product.

    Return to top

  • TC100
    Vacuum cleaner 3 in 1, TC100, is provided with two filters.
    One fabric that is washable and the other paper you can find on our website under"accessories shop."

    Return to top

5. Linen & clothe care

  • Steam plant
    STEAM PLANT
    When to change the filter of my steam station?

    We advise our customers to change the filters vapors plants every 3-6 months depending on usage and water hardness.

    The filter prevents the pie to build up in the central however it is possible to complete its work by manual cleanings (1 to 3 times per year). Simply put in the tank 50% water mixed with 50% white vinegar, heat the unit and leave for 2 hours. After the elapsed time, simplyempty the tank and rinse several times.
    What is the filter to my central steam or find it?

    Here is the list of our plants vapors as well as compatible filters:


    REFERENCE

    __________________

    ACCESSOIRES

    ________________________

    G2


    VF5

    G6


    __________________

    V5I / V5

    VF5

    V6

    V85

    V6


    __________________

    G1

     KG71

    Return to top

  • U600
    You can now find CU6 wax for the U600 shoe polisher on our partners' websites.

    Return to top